 |
I bought a traveler car from Catalina Direct so that I
won't have to dig out the pliers and wrestle with those nuisance
thumbscrews each time I want to adjust the traveler. I'd acquired the rest
of the parts that I'd need, and yesterday began rigging the control lines.
(May 5, 2005) |
 |
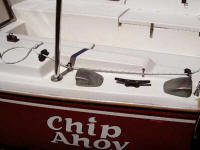
Once the traveler car was mounted on the traveler bar, I
ran the 1/4" control lines around the stern and forward,
determining where the hardware needed to be
mounted. |
 |
The first challenge I encountered was, each side of the
deck is different: on the port side there is the aft vent to get
around; on the starboard is the stern light. I decided to start the
control lines forward along the outside of the coaming. A turning block
redirects
the line forward on each side, and a fairlead brings the control lines
alongside the coaming. |
 |
Forward of the turning blocks and
fairleads, the next challenge was stepping it up to the top of the coaming,
clearing the coaming's edge and leading the line to where I planned to
install Harken Cam-Matic cam cleats. To make the step up, I used small spring-loaded
stand-up bullet blocks. On the top edge of the coaming I mounted the cam cleats.
(Geez, the name on the side's going to have to be touched up before
launch!) |
 |
A closer view of the port side turning block and fairlead.
To get better access to attach the fairlead, I removed the stern cleats. I rebedded
them, then used large fender washers when reinstalling them, instead of the
small washers that I'd found upon their removal. |
 |
A closer view of the port side cam cleat and spring-loaded
stand-up bullet
block. |
 |
After tightening everything down into the bedding
compound this morning, I added a cam cleat with fairlead to each side for the jib
sheets. The jib sheet cleats also had been originally installed also using only small washers,
so I
replaced them with large fender washers. |
 |
On the starboard side, I led the control line
to its turning block just ahead
of the stern light then forward using the same procedure as on the port
side. (May 5. 2005) |
 |
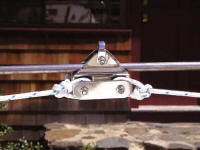
UPDATE: After a smart suggestion from Dick King on the
discussion
list this morning, I rearranged the traveler control lines on the traveler car
to provide a 2:1 mechanical advantage. To accomplish this, I added two 1/4"
twist shackles
to the traveler bar (twist shackles to prevent the lines from chafing
against the thumbscrew stops, which hold them outboard). I also removed
the thumbscrews and replaced them with stainless steel set-screws. Then I routed the control lines through the
traveler car and back to their respective shackles, where they are tied off. (May 6, 2004) |
 |
The traveler car, back view looking
forward, with the new control line
arrangement. --
See subsequent 2009
improvement -- |
| Moving on
with Season 2005 improvements
|
| It's never-ending ...
but spring has arrived at last, the projects have begun! |


