I last refinished the
cribboards in 2004, the
teak trim in 2008. The
end of last
season brought a bit of cosmetic damage to the cribboards and the sliding hatch's
teak eyebrow. I'd used strips of duct tape to seal the gaps between them
before the remnants from
Hurricane Earl arrived in September, then a subsequent nor'easter in October.
When I removed the duct tape it also pulled off paint and varnish. The plan was
to bring them inside for the winter and refinish them again. After
trailering Chip Ahoy home
for winter storage, I closed up the
companionway with a piece of tarp -- and more duct tape -- then covered
the boat for the winter.With the hint of spring
in the air at last, the daylight temperatures rising to above freezing, it's time to start my "winter" indoor project for
this year, somewhat later than usual, but it's been
a very hard winter
with near-record snowfall that's kept me busy moving it out of the way
almost non-stop.
Immediately upon uncovering Chip Ahoy I'm going to
need to remove the piece of tarp taped over the companionway opening and
have the cribboards and hatch eyebrow ready to install, Job One this
season. This is New England after all, where we don't have spring so
much as monsoon season.
Yesterday I cleared off the clothes dryer and put the
standby sheet of plywood over the washer and dryer, again creating my
temporary workbench. This morning I laid out the damaged pieces, and began the prep work.
After removing the latch hardware, I cleaned up the cribboards and
eyebrow with acetone. Then I masked off the louvered vent insert in the
top board, both sides, to avoid damaging the teak while sanding or later
painting around it.
It was reasonably warm today -- low-50s -- so I took
the pieces outside and sanded them smooth using my Makita finishing
sander and 80
grit paper. Starting late has its advantage: It's better to create the dust outdoors this time instead of
it floating around in the laundry room waiting to settle into the wet paint
finish.
I had intended to remove the
hatch handle from the eyebrow, but
it's so solidly attached even without its two screws, cemented by bedding
compound, that I decided to leave well enough alone; as a handle it
needs all the strength it can have. After masking off its base, I
hand-sanded the eyebrow lightly with 100 grit paper.
With the sanding complete, I decided to repair some of
the small damage on the cribboards -- primarily a corner piece on the
lower board that broke off last season, but as long as I had the Marine-Tex out, mixed, and some leftover, I touched up a few minor dings.
|
 |
|
|
CLICK TO
ENLARGE |
|
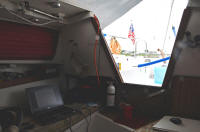
The lower cribboard when removed doubles as sort of my
cabin desktop (photo left). When using the laptop aboard I run the wireless mouse
over its surface; it fits nicely on my lap when I need something to
write on, so I want it glass smooth.
Once I sand and shape the filler tomorrow then the
prep work will be done and the painting and varnishing can begin. Since
I'm doing both sides of the cribboards, and expect to apply two or three
coats, drying time will stretch this little project out for likely a
good week. (Mar. 6, 2011)